Showing posts with label MS-Word. Show all posts

Tuesday, April 19, 2011

Watermarks in Microsoft Word

Microsoft Word 2007 offers a variety of ways to protect your important documents. One way to easily identify and secure your personal documents is to apply a watermark to your document. A watermark may be a picture or text that shows in the background of a document and is the trademark for the author of the document. Watermarks usually indicate the status or priority of the document. For example, the watermark might say “Urgent,” “Confidential” or “ASAP.” An example of a watermark is shown below:


The steps to apply a watermark are listed below:
1. Open Microsoft Word 2007.
2. Select Page Layout from the menu bar.
3. Select Watermark.
4. Choose a Watermark from the given options or Select Custom Watermark.
5. Choose your preferences for the watermark.
6. Select Apply.

            A watermark can be added to a document at any time. You can also opt to modify or remove a watermark from the document at any time.  So whenever you feel the need, just leave your mark!

-AS


Tuesday, March 8, 2011

Save time using shortcut keys

How much time do you waste searching for the right formatting option or icon in a Microsoft Word document? Well, there are many helpful tips for when you want to format a document quicker. You can use shortcut keys on the keyboard to carry out functions.


The following are some helpful shortcut keys in Microsoft Word:

  • Ctrl + A to select the entire document
  • Ctrl + B to bold the words
  • Ctrl + C to copy
  • Ctrl + D to open the font dialogue box
  • Ctrl + E to centrally align
  • Ctrl + F to find
  • Ctrl + G to go to
  • Ctrl + H to replace
  • Ctrl + I to italicize the words
  • Ctrl + K to insert hyperlink
  • Ctrl + N to open new document
  • Ctrl + O to open an existing document
  • Ctrl + P to print the document
  • Ctrl + R to go to end of the line
  • Ctrl + S to save the document
  • Ctrl + T to go one tab ahead
  • Ctrl + U to underline the words
  • Ctrl + V to paste the copied or cut words or sentences
  • Ctrl + X to cut
  • Ctrl + Y redo button
  • Ctrl + Z undo button
  • Ctrl + Shift + D to double underline the words
  • Shift + F3 to change uppercase to lowercase, or lowercase to uppercase
  • Shift + F7 to look in thesaurus
  • Ctrl + Shift + F to change the font name, for example: Times New Roman, Arial, etc
  • Ctrl + Shift + P to change the font size, for example: 10 points or 12 points
  • Ctrl + Shift + G to count the words in the document
  • Ctrl + Shift + L to insert bullet points
  • Ctrl + Shift + Q to change the font to symbol
 Note: “+” sign means that you have to press these buttons all at once.

-AS

Thursday, February 24, 2011

Customizing Bullets

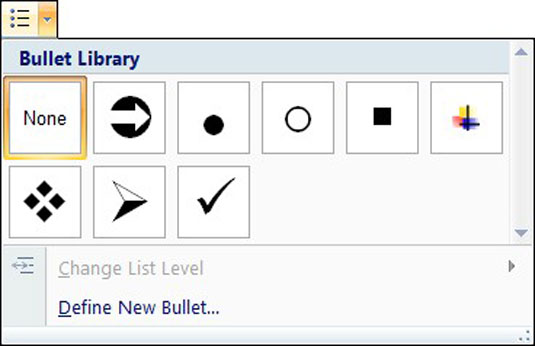
 When creating documents in Microsoft Word it is often necessary to create bulleted lists when trying to convey concise points.  This allows the reader to find important information very quickly and eliminates the monotony of long paragraphs so the reader can stay focused.  Microsoft Word contains many different types of bullets to create variety. However you are also able to customize a bullet to suit your document theme, color, or mood.  Also a list may contain more than one type of bullet, for example a green plus sign for pros (+) and a red minus sign for cons (-).

  1.    Position Cursor  in desired area
  2.    Select the Home tab
  3.   Click the down arrow beside the bullet icon
  4.   Select define new bullet from the drop down menu
  5.   Choose either symbol, picture or font
  6.    For symbol or font choose from the available option and select ok
  7.    For picture, locate a saved image you would like to use
  8.   Select the picture, then click ok
  9.   First bullet will appear; proceed creating list as usual.

Have fun creating your own bullets!

-AS

MS-Excel data into MS-Word document


Microsoft office comes with this excellent feature that allows you to insert data created in Excel into Word documents. This is helpful especially when you are using Word to create business documents such as reports and business plans. While it is an easy process, you have to be aware of your options and the limitations inherent in each of the options.


One way to do it is to insert a link to an Excel worksheet in your Word document.  For users who want to ensure that the information is updated every time a change is made to the spreadsheet, this is the way to go. However, you have to make sure that you have to re-establish the link if you move the Excel file. Also, if you plan to transport the Word file for use on another computer, you will need to remember to include the Excel file.


To insert a link to an Excel file, follow these simple steps:


1. Open both the Word document and the Excel spreadsheet.
2. In Excel, copy the range of cells you want to include (if you plan to insert more columns or rows into your spreadsheet, select the entire worksheet by clicking the box at the juncture of the row numbers and column letters).
3. In your Word document position the cursor where you would like the table inserted.
4.  On the Clipboard menu, click on the dropdown menu under Paste and select Paste Special.
5.  Click the radio button beside Paste link
6. Under the label As:, select Microsoft Excel Worksheet Object
 7. Click OK 

-AS

Friday, January 28, 2011

MS Word file into PDF file

Knowing how to save a Word file in PDF format is very useful for many reasons. First of all, PDF (portable document file) ensure format of your printed or viewed document. Secondly, a rather lengthy Word document saved in PDF format can be time-saving because there are a great deal of options in a PDF file, such as next/previous arrows, that allows readers to view instead of scrolling the whole document.
To save a Word file in PDF format, follow steps below:
1)      Click the Microsoft Office Button
, on the top left of Microsoft Word screen
2)      Select PDF or XPS option under Save As
3)      In the File Name, type a name for the document
4)      Click PDF in the Save As Type list   
5)      Select Open file after publishing check box (available only if a PDF reader is installed in your computer) after saving the document if users want to view
6)      Next to Optimize for are the two printing options. Choose one that fits your document size
7)      If printing/printing certain desired pages is needed, click Options
8)      Click Publish