Tuesday, March 8, 2011

Basic Trouble Shooting


My computer locks ups and/or is acting strange! 

1.  If the computer is frozen and will not respond to any commands, it may be necessary to press Ctrl + Alt + Del (all three keys at the same time) to bring up the Task List.  Select any program that says "Not responding" and click the End Task button.  Repeat until all tasks are ended.  If this does not work, turn the computer off, wait several seconds, turn the computer back on, and let the computer run the Scandisk. 
2.  Reboot it.  A majority of problems that occur while you are using your computer can be fixed by rebooting.  Applications sometimes don’t release memory like they should when they are finished.  The end result is your computer locks up or acts really weird.  When you reboot, memory registers are cleared and most everything is reset.  This fixes a lot of problems.
Special Note
It doesn't hurt a computer to leave it running all the time.  However, using the computer for long periods of time causes small problems that can build into larger ones.  When Windows reboots, it fixes most of these small problems.  Therefore, restarting the computer periodically while working can help reduce the risk of glitches.  

My keyboard doesn't work!

1.  Press Ctrl + Alt + Del (all three keys at the same time) to bring up the Task List.  Select any program that says "Not responding" and click the End Task button.  Repeat until all tasks are ended.  Check periodically to see if the keyboard will work.
2.  Check to make sure the keyboard is still properly connected to the computer.  If the keyboard has been disconnected, you may have to reboot your computer.
3.  If all else fails, then turn the power off.  Wait a couple of minutes before turning the computer back on.

Special Note
One of the dirtiest parts of your computer is the keyboard.  Regular cleaning will help keep the keyboard working properly.  First, blow compressed air through the spaces in between the keys to remove dust and lint.  If you shake your keyboard upside-down this will also remove some of the particles.
Another keyboard problem that could occur is when you turn your computer on and you get a message that no keyboard was detected or you get into Windows but are not able to type.  Remove the keyboard connector for the CPU, examine the pins in the connector to ensure they are straight, then reinsert the connector.  Also, check and make sure the mouse and keyboard connectors have not been switched.  If the keyboard still doesn’t work try connecting, another keyboard that you know is working.  This will determine if you need a new keyboard or if you have a CPU problem.

The mouse doesn't work!

Check to make sure the mouse is still properly connected to the computer.  If the mouse has been disconnected, you may have to reboot your computer.
Like the keyboard, the mouse pad is sitting in the open most of the time getting dusty, wet, slimed, or anything else that happens on you desktop.  The mouse then rolls over whatever has collected on the mouse pad and gets inside, gumming up the works.  To clean the mouse pad, wipe it off occasionally with a damp cloth or get a new one.
You also need to clean your mouse regularly, as often as twice a week.  If you turn your mouse over, you’ll notice a round ball with a cover over it.  This cover can be twisted off and the ball will come out.  Roll the ball on a clean, lint free cloth.  Then take a look at the rollers inside the mouse.  Take tweezers, a screwdriver, or even your fingernail to scratch the dirt and lint off the rods.  Next, you should look inside the mouse and clean out any other dirt or lint that is hiding in there.  Finally, replace the ball and twist back on the cover.

Tips are suggested by the  Winn Parish School Board. -DH

Save time using shortcut keys

How much time do you waste searching for the right formatting option or icon in a Microsoft Word document? Well, there are many helpful tips for when you want to format a document quicker. You can use shortcut keys on the keyboard to carry out functions.


The following are some helpful shortcut keys in Microsoft Word:

  • Ctrl + A to select the entire document
  • Ctrl + B to bold the words
  • Ctrl + C to copy
  • Ctrl + D to open the font dialogue box
  • Ctrl + E to centrally align
  • Ctrl + F to find
  • Ctrl + G to go to
  • Ctrl + H to replace
  • Ctrl + I to italicize the words
  • Ctrl + K to insert hyperlink
  • Ctrl + N to open new document
  • Ctrl + O to open an existing document
  • Ctrl + P to print the document
  • Ctrl + R to go to end of the line
  • Ctrl + S to save the document
  • Ctrl + T to go one tab ahead
  • Ctrl + U to underline the words
  • Ctrl + V to paste the copied or cut words or sentences
  • Ctrl + X to cut
  • Ctrl + Y redo button
  • Ctrl + Z undo button
  • Ctrl + Shift + D to double underline the words
  • Shift + F3 to change uppercase to lowercase, or lowercase to uppercase
  • Shift + F7 to look in thesaurus
  • Ctrl + Shift + F to change the font name, for example: Times New Roman, Arial, etc
  • Ctrl + Shift + P to change the font size, for example: 10 points or 12 points
  • Ctrl + Shift + G to count the words in the document
  • Ctrl + Shift + L to insert bullet points
  • Ctrl + Shift + Q to change the font to symbol
 Note: “+” sign means that you have to press these buttons all at once.

-AS

Friday, February 25, 2011

Moodle for Professors I

Course Page Overview
The following is a view of a sample course page. These are the default blocks that display when
you create a new course. You will see 3 columns left to right. The middle column is where you
will put your course text, information, and resources organized by a week or topic. This view is
in editing mode. Below are brief descriptions of these default blocks.
  • People contains a list of all the students and participants enrolled in this course.
  • Quickmail
    participants in their course. Messages sent using this program are delivered to the
    Participant's external or Bard e-mail accounts.
    is Moodle's internal mail program allowing the Professor to contact all
  • Administration
    and teacher enrollments and their groups, the course gradebook, and custom grading
    scales. Students only see a link to their Profile and Grades in this block.
    contains links allowing Professors to manage course settings, student
  • Latest News
    archived news. See the
    of this document.
    displays recent posts made in the News Forum, along with a link to olderNews Forum description in the Adding Course Content section
  • Calendar
    course groups, or individual students.
    is a useful tool for displaying events for administrators, course members,
-TG

Thursday, February 24, 2011

Customizing Bullets

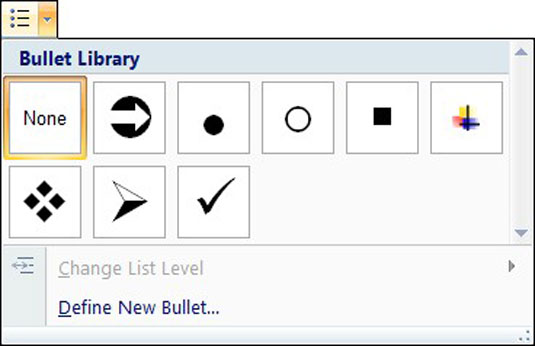
 When creating documents in Microsoft Word it is often necessary to create bulleted lists when trying to convey concise points.  This allows the reader to find important information very quickly and eliminates the monotony of long paragraphs so the reader can stay focused.  Microsoft Word contains many different types of bullets to create variety. However you are also able to customize a bullet to suit your document theme, color, or mood.  Also a list may contain more than one type of bullet, for example a green plus sign for pros (+) and a red minus sign for cons (-).

  1.    Position Cursor  in desired area
  2.    Select the Home tab
  3.   Click the down arrow beside the bullet icon
  4.   Select define new bullet from the drop down menu
  5.   Choose either symbol, picture or font
  6.    For symbol or font choose from the available option and select ok
  7.    For picture, locate a saved image you would like to use
  8.   Select the picture, then click ok
  9.   First bullet will appear; proceed creating list as usual.

Have fun creating your own bullets!

-AS

MS-Excel data into MS-Word document


Microsoft office comes with this excellent feature that allows you to insert data created in Excel into Word documents. This is helpful especially when you are using Word to create business documents such as reports and business plans. While it is an easy process, you have to be aware of your options and the limitations inherent in each of the options.


One way to do it is to insert a link to an Excel worksheet in your Word document.  For users who want to ensure that the information is updated every time a change is made to the spreadsheet, this is the way to go. However, you have to make sure that you have to re-establish the link if you move the Excel file. Also, if you plan to transport the Word file for use on another computer, you will need to remember to include the Excel file.


To insert a link to an Excel file, follow these simple steps:


1. Open both the Word document and the Excel spreadsheet.
2. In Excel, copy the range of cells you want to include (if you plan to insert more columns or rows into your spreadsheet, select the entire worksheet by clicking the box at the juncture of the row numbers and column letters).
3. In your Word document position the cursor where you would like the table inserted.
4.  On the Clipboard menu, click on the dropdown menu under Paste and select Paste Special.
5.  Click the radio button beside Paste link
6. Under the label As:, select Microsoft Excel Worksheet Object
 7. Click OK 

-AS