Friday, February 25, 2011

Moodle for Professors I

Course Page Overview
The following is a view of a sample course page. These are the default blocks that display when
you create a new course. You will see 3 columns left to right. The middle column is where you
will put your course text, information, and resources organized by a week or topic. This view is
in editing mode. Below are brief descriptions of these default blocks.
  • People contains a list of all the students and participants enrolled in this course.
  • Quickmail
    participants in their course. Messages sent using this program are delivered to the
    Participant's external or Bard e-mail accounts.
    is Moodle's internal mail program allowing the Professor to contact all
  • Administration
    and teacher enrollments and their groups, the course gradebook, and custom grading
    scales. Students only see a link to their Profile and Grades in this block.
    contains links allowing Professors to manage course settings, student
  • Latest News
    archived news. See the
    of this document.
    displays recent posts made in the News Forum, along with a link to olderNews Forum description in the Adding Course Content section
  • Calendar
    course groups, or individual students.
    is a useful tool for displaying events for administrators, course members,
-TG

Thursday, February 24, 2011

Customizing Bullets

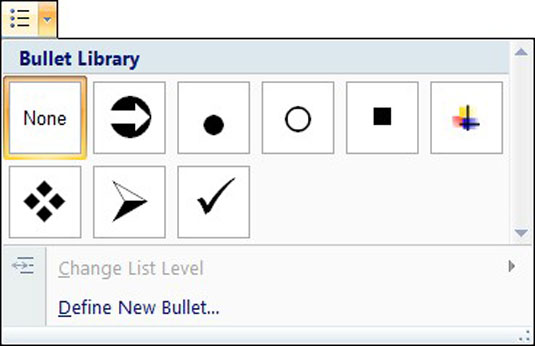
 When creating documents in Microsoft Word it is often necessary to create bulleted lists when trying to convey concise points.  This allows the reader to find important information very quickly and eliminates the monotony of long paragraphs so the reader can stay focused.  Microsoft Word contains many different types of bullets to create variety. However you are also able to customize a bullet to suit your document theme, color, or mood.  Also a list may contain more than one type of bullet, for example a green plus sign for pros (+) and a red minus sign for cons (-).

  1.    Position Cursor  in desired area
  2.    Select the Home tab
  3.   Click the down arrow beside the bullet icon
  4.   Select define new bullet from the drop down menu
  5.   Choose either symbol, picture or font
  6.    For symbol or font choose from the available option and select ok
  7.    For picture, locate a saved image you would like to use
  8.   Select the picture, then click ok
  9.   First bullet will appear; proceed creating list as usual.

Have fun creating your own bullets!

-AS

MS-Excel data into MS-Word document


Microsoft office comes with this excellent feature that allows you to insert data created in Excel into Word documents. This is helpful especially when you are using Word to create business documents such as reports and business plans. While it is an easy process, you have to be aware of your options and the limitations inherent in each of the options.


One way to do it is to insert a link to an Excel worksheet in your Word document.  For users who want to ensure that the information is updated every time a change is made to the spreadsheet, this is the way to go. However, you have to make sure that you have to re-establish the link if you move the Excel file. Also, if you plan to transport the Word file for use on another computer, you will need to remember to include the Excel file.


To insert a link to an Excel file, follow these simple steps:


1. Open both the Word document and the Excel spreadsheet.
2. In Excel, copy the range of cells you want to include (if you plan to insert more columns or rows into your spreadsheet, select the entire worksheet by clicking the box at the juncture of the row numbers and column letters).
3. In your Word document position the cursor where you would like the table inserted.
4.  On the Clipboard menu, click on the dropdown menu under Paste and select Paste Special.
5.  Click the radio button beside Paste link
6. Under the label As:, select Microsoft Excel Worksheet Object
 7. Click OK 

-AS